
本文包括用于文本识别的 OCR、用于信息提取的语言模型和 NER,以及用于特定数据模式匹配和填写表单的正则表达式/规则。
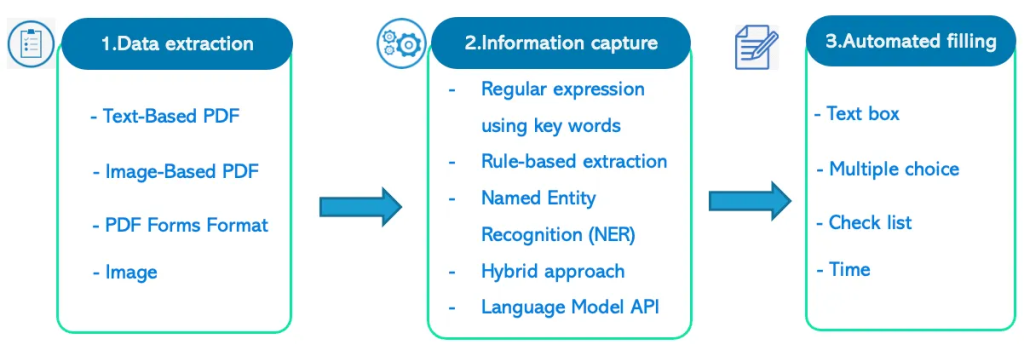

1. 文本数据提取
格式:基于文本的 PDF、基于图像的 PDF、图像
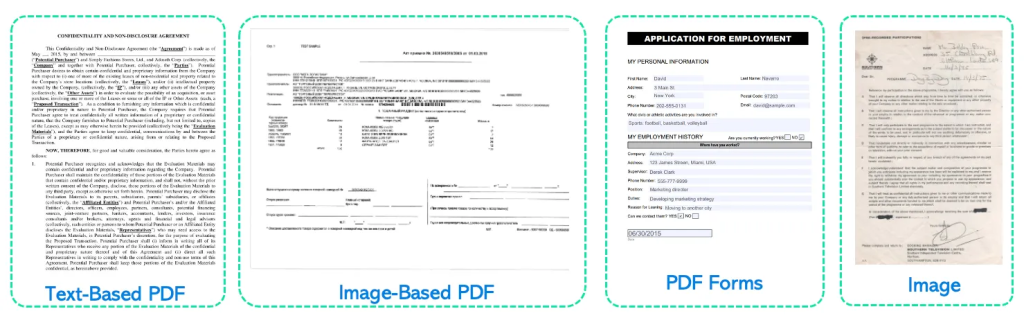
为了有效地从这些格式中提取文本,我建议使用 Python 中的 PDF2 包。
# Import library
from PyPDF2 import PdfReader

# Open the PDF file
pdf_file = PdfReader(open("data/sample.pdf", "rb"))

# Read all the pages in the PDF
pages = [pdf_file.pages[i] for i in range(len(pdf_file.pages))]

# Join all the pages into a single string
text = '\n'.join([page.extract_text() for page in pages])
在本例中,我们将所有文本保存在一个名为“text”的字符串中。
2. 信息采集
假设我们只需要从此演示的数据中获取 5 个元素:first_name, last_name, address, phone, date_of_birth.
正则表达式方法
这种传统方法存在一些缺点,因为它只适用于结构化输入数据,并且搜索列表可能会用尽。
# Import Regular Expression
import re

# Create empty lists to store our data
first_names = []
last_names = []
addresses = []
phones = []
dates_of_birth = []

# Define a function to capture the information from text file using Regular Expression
def extract_info_1(text, first_names, last_names, addresses, phones, dates_of_birth):
    # Use regular expressions to search for the relevant information in the text
    Address_keys = ["Location", "Located at", "Address", "Residence", "Premises", "Residential address"]
    BOD_keys = ["Born on", "DOB", "Birth date", "Date of birth"]
    Phone_keys = ["Phone", "Telephone", "Contact number", "Call at", "Phone number", "Mobile number"]
    First_Name_keys = ["First name", "Given name", "First", "Given", "Tenant", "First and last name"]
    Last_Name_keys = ["Last name", "Family name", "Surname", "Last"]

    for keyword in Address_keys:
        matches = re.findall(keyword + "\s*:\s*(.*)", text, re.IGNORECASE)
        if matches:
            addresses.extend(matches)

    for keyword in BOD_keys:
        matches = re.findall(keyword + "\s*:\s*(.*)", text, re.IGNORECASE)
        if matches:
            dates_of_birth.extend(matches)

    for keyword in Phone_keys:
        matches = re.findall(keyword + "\s*:\s*(.*)", text, re.IGNORECASE)
        if matches:
            phones.extend(matches)

    for keyword in First_Name_keys:
        matches = re.findall(keyword + "\s*:\s*(.*)", text, re.IGNORECASE)
        if matches:
            first_names.extend(matches)

    for keyword in Last_Name_keys:
        matches = re.findall(keyword + "\s*:\s*(.*)", text, re.IGNORECASE)
        if matches:
            last_names.extend(matches)

# Apply function
extract_info_1(text, first_names, last_names, addresses, phones, dates_of_birth)
命名实体识别模型
在 spaCy 的 NER(命名实体识别)模型中,实体被分类为各种类型,以识别和标记文本中不同类型的命名实体。spaCy的NER模型识别的实体类型包括但不限于:
PERSON、ORG、LOC、日期、TIME、MONEY、PERCENT、数量、基数、产品、EVENT、LANGUAGE、法律、WORK_OF_ART、PHONE
GPE:例如国家、城市和州。
NORP:国籍、宗教或政治团体。
FAC:设施、建筑物或构筑物的名称。
import spacy

# Load the large English NER model
nlp = spacy.load("en_core_web_sm")

# Define a function to capture the information from text using Named Entity Recognition
def extract_info_3(text, first_names, last_names, addresses, phones, dates_of_birth):
    # Initialize variables to store extracted information
    first_name = ""
    last_name = ""
    address = ""
    phone = ""
    date_of_birth = ""

    # Process the text with spaCy NER model
    doc = nlp(text)

    # Extract the information using Named Entity Recognition
    for ent in doc.ents:
        if ent.label_ == "PERSON":
            # Check if the entity text is a first name
            if not first_name:
                first_name = ent.text.strip()
            else:
                # If we already have a first name, assume the current entity is the last name
                last_name = ent.text.strip()
        elif ent.label_ == "GPE":
            # GPE represents geographical entities, which could include addresses
            address = ent.text.strip()
        elif ent.label_ == "PHONE":
            # PHONE entity type (custom) for phone numbers
            phone = ent.text.strip()
        elif ent.label_ == "DATE":
            # DATE entity type for dates, which could include date of birth
            date_of_birth = ent.text.strip()

    # Append the extracted information to the pre-defined lists
    first_names.append(first_name)
    last_names.append(last_name)
    addresses.append(address)
    phones.append(phone)
    dates_of_birth.append(date_of_birth)
In-Context Learning Model
# 1. Import the necessary libraries
import openai
import os
import pandas as pd
import time

# 2. Set your API from ChatGPT account
openai.api_key = '<YOUR API KEY>'

# 3. Set up a function to get the result
def get_completion(prompt, model="gpt-3.5-turbo"):
    messages = [{"role": "user", "content": prompt}]
    response = openai.ChatCompletion.create(
        model=model,
        messages=messages,
        temperature=0,
        )
    return response.choices[0].message["content"]

# 4. Create a promt from text file and our words:
question = "Read and understand the document, then help me extract 5 pieces of information including (1) First name, (2) last name, (3) date of birth, (4) address, (5) phone number  of tenants only. Here is the content of the document: ".join(text)

# 5. Query the API
response = get_completion(question)
print(response)
LayoutLMv3
LayoutLMv3 是一个预训练模型,它是在包含 1100 万个文档图像及其相应文本嵌入的海量数据集上训练的。数据集包含多种单据类型,包括发票、收据、合同和病历。出于这个原因,在训练模型时,我们保留了大多数层的所有权重,只需要微调、解冻网络中的最后几层。我们训练得越多,我们就不会得到太多的准确性,唯一需要的就是有一个好的输入数据集。
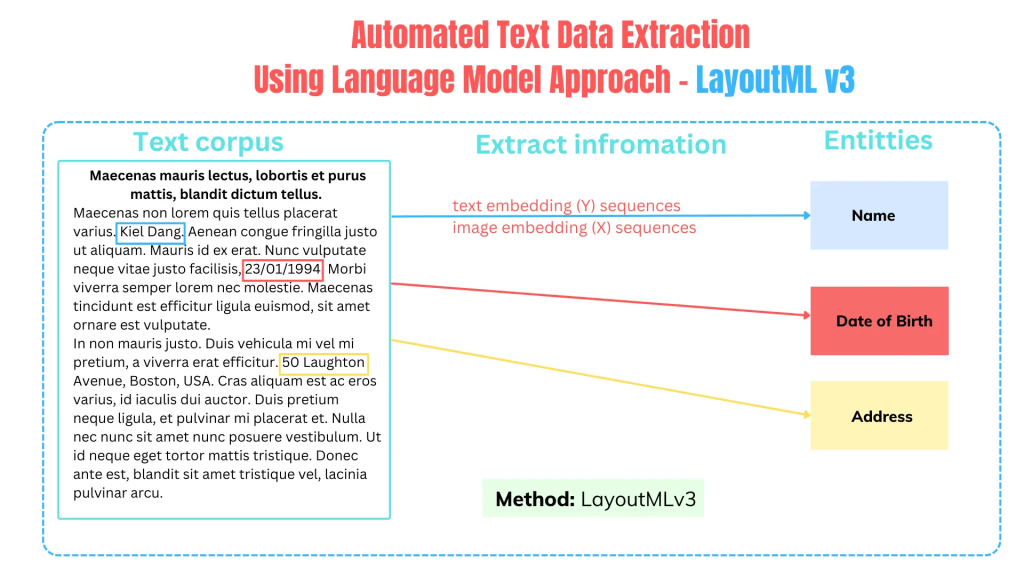
LayoutLMv3 是一个强大的语言模型,擅长理解 (1) 文档的结构(位置)和 (2) 内容。将其视为一种高度先进的工具,不仅可以识别单词,还可以理解它们在该文档中的位置以及 (3) 文档中的关系。在处理各种文档格式(包括 PDF、图像和表单)时,此功能至关重要。可以针对各种文档分析任务(如文档分类、NER 和问答)对 LayoutLMv3 模型进行微调。
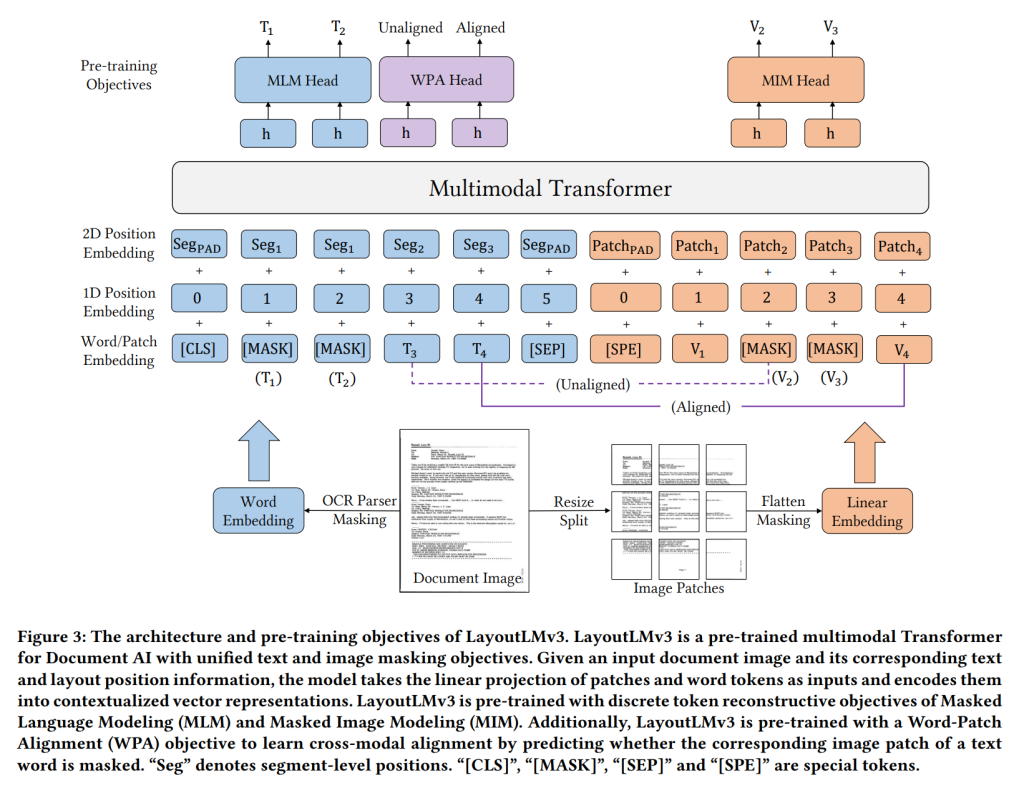
LayoutLMv3 体系结构类似于 Transformer 体系结构,但增加了一些组件:
文本嵌入层(文档内容):此层将文档的文本转换为数字表示形式。上面的蓝色区域。
图像嵌入层(文本/信息的位置):该层将文档的图像转换为数字表示。上面的橙色区域。
跨模态注意力层(文本与其位置的关系):该层允许模型学习文本和图像嵌入之间的关系。上面的紫色区域。
LayoutLMv3 的一些用例:
- Document classification:
文档分类:将文档分类为不同的类别,例如发票、收据、合同和病历。 - Named entity recognition (NER):
命名实体识别 (NER):从文档(如人员、地点、组织和产品)中识别和提取命名实体。 - Question answering:
问题解答:回答有关文件内容的问题,例如“此发票的总价是多少?”或“此病历中患者的诊断是什么? - Document visual question answering:
文档可视化问答:回答有关文档可视化布局的问题,例如“客户在此合同上的签名在哪里?”或“此目录中此产品的价格是多少? - Form understanding:
表单理解:从表单中提取信息,例如贷款申请、保险索赔和纳税申报表。 - Receipt processing:
收据处理:从收据中提取信息,例如购买日期和时间、购买的商品以及花费的总金额。
- Invoice processing:
发票处理:从发票中提取信息,例如供应商名称、发票编号、到期日期和行项目。 - Contract analysis:
合同分析:从合同中提取关键信息,例如相关方、合同条款和双方签名。 - Medical record analysis:
病历分析:从病历中提取关键信息,例如患者的人口统计数据、病史和治疗计划。 - E-discovery:
电子取证:从大量电子数据中识别和提取相关文档。 - Fraud detection:
欺诈检测:识别欺诈性文件,例如假发票和伪造支票。 - Customer support:
客户支持:回答客户有关其文档和帐户的问题。 - Research:
研究:对新闻文章、科学论文和历史记录等文件进行研究。
LayoutLMv3 可用于各种行业,包括金融、医疗保健、法律、保险和零售。它是一个强大的工具,可以帮助企业自动化他们的文档处理任务,改善他们的客户服务,并降低他们的欺诈风险。
注释工具
- Piaf : Free, link: https://github.com/etalab/piaf
- PDF24 Tools: Free, link: https://tools.pdf24.org/en/annotate-pdf
- Label Studio: Free Trial: link: https://labelstud.io/guide/get_started.html
- Tagtog Annotation Tool: For Business: link: https://docs.tagtog.com/pdf-annotation-tool.html
- UbiAi: For Business: link: https://ubiai.tools/ . Tutorial for this tool can be found here: https://www.youtube.com/watch?v=r1aoFj974FU&ab_channel=KarndeepSingh
- Markup Hero: For business: https://markuphero.com/try/annotate-pdf.html
微调训练流程见后文。
3. 表格自动填写
演示如何使用 Selenium 从外部填写表单进行网页浏览和填充。
from selenium import webdriver
from selenium.webdriver.support.ui import Select
import time

# Load the website
web = webdriver.Chrome()
web.get('https://secure.sonnet.ca/#/quoting/property/about_you?lang=en')

# Wating for the web to load before filling out
time.sleep(5)

# Inputs field
#ADDRESS
Address_input = "50 Laughton Ave M6N 2W9" # KEY
Address_fill = web.find_element("xpath",'//*[@id="addressInput"]')
Address_fill.send_keys(Address_input)

# FIRST NAME
FirstName_input = "Kiel" # KEY
FirstName_fill = web.find_element("xpath",'//*[@id="firstName"]')
FirstName_fill.send_keys(FirstName_input)

# LAST NAME
LastName_input = "Dang" # KEY
LastName_fill = web.find_element("xpath",'//*[@id="lastName"]')
LastName_fill.send_keys(LastName_input)

# MONTH OF BIRTH
dropdown_month = web.find_element("id","month-0Button")
dropdown_month.click()
option = web.find_element("xpath", "//span[contains(text(), 'January')]") #KEY
option.click()

# DATE OF BIRTH
Date_input = "23" # KEY
Date_fill = web.find_element("xpath",'//*[@id="date-0"]')
Date_fill.send_keys(Date_input)

# YEAR OF BIRTH
Year_input = "1994" # KEY
Year_fill = web.find_element("xpath",'//*[@id="year-0"]')
Year_fill.send_keys(Year_input)

# Prevent auto closing the web after application finishes the script.
input("Press enter to close the browser")
web.quit()
4. 微调
构建带注释的数据集
pip install docai-py
https://github.com/butlerlabs/docai
定义要从文档中提取的信息,例如:
- First Name (we’ll include Middle Initial here as well)
名字(我们在这里也包括中间名首字母) - Last Name 姓
- Address 地址
- Date of Birth 出生日期
- Expiration Date 有效期
- Driver’s License Number 驾照号码
要进行批注,请确保选择了正确的字段,只需在文档中的文本周围拖动一个框即可。如果您愿意,也可以单击单个文本片段。

将批注转换为 LayoutLM 格式:
# Download annotations from Butler using docai library
from docai.annotations import AnnotationClient
from docai.generated.models import ModelTrainingDocumentStatus

# Get your API Key from Butler
API_KEY = "MY_API_KEY"

# Specify the id of the model that you annotated your documents in
MODEL_ID = "MY_MODEL_ID"

# Load annotations from Butler
butler_client = AnnotationClient(API_KEY)
annotations = butler_client.load_annotations(
    model_id=MODEL_ID,
    load_all_pages=True,
    document_status=ModelTrainingDocumentStatus.LABELED
)
print("Loaded {} annotations".format(len(annotations.training_documents)))
MY_API_KEY和 MY_MODEL_ID 参考链接:
https://docs.butlerlabs.ai/reference/authentication
https://docs.butlerlabs.ai/reference/finding-a-model-id
我们需要转换为转换器库和 LayoutLMv3 更易于使用的格式。
from docai.annotations import normalize_ner_annotation_for_layoutlm

# Convert annotations into NER format so they can be used
# to train LayoutLMv3 with Hugging Face
annotations_as_ner = annotations.as_ner(as_iob2=True)

# Normalize NER annotations by 1000 to match LayoutLM expected bounding box format
annotations_as_ner = list(map(normalize_ner_annotation_for_layoutlm, annotations_as_ner))
我们将注解转换为通用的NER格式。load_annotations功能目前不支持多页文档。仅包含多页文档的第一页。以 NER 格式加载后,我们对边界框进行规范化,使它们介于 0 和 1000 之间。
我们将注解加载到 Hugging Face Dataset 对象中:
# Create Hugging Face Dataset
from datasets import Dataset
dataset = Dataset.from_list(annotations_as_ner)
print(dataset)
自定义数据集上的训练
# First, lets create a few helper variables for use below
from datasets.features import ClassLabel
from docai.annotations import get_ner_tags_for_model

model_ner_tags = get_ner_tags_for_model(annotations.model_details)
print(f'Tags: {model_ner_tags["tags"]}')

label_list = model_ner_tags["tags"]
class_label = ClassLabel(names=label_list)
id2label = {k: v for k,v in enumerate(label_list)}
label2id = {v: k for k,v in enumerate(label_list)}
column_names = dataset.column_names

# Split dataset into train/test
dataset = dataset.train_test_split(test_size=0.1)
将数据集转换为 LayoutLM 格式
首先从 Hugging Face 集线器加载 layoutlmv3-base 处理器:
# Load the microsoft/layoutlmv3-base processor from the Hugging Face hub
from transformers import AutoProcessor

processor = AutoProcessor.from_pretrained("microsoft/layoutlmv3-base", apply_ocr=False)

def convert_ner_tags_to_id(ner_tags):
  return [label2id[ner_tag] for ner_tag in ner_tags]

# This function is used to put the Dataset in its final format for training LayoutLM
def prepare_dataset(annotations):
    images = annotations['image']
    words = annotations['tokens']
    boxes = annotations['bboxes']
    # Map over labels and convert to numeric id for each ner_tag
    ner_tags = [convert_ner_tags_to_id(ner_tags) for ner_tags in annotations['ner_tags']]

    encoding = processor(images, words, boxes=boxes, word_labels=ner_tags, truncation=True, padding="max_length")

    return encoding
然后准备训练数据集和评估数据集:
from datasets import Features, Sequence, ClassLabel, Value, Array2D, Array3D

# Define features for use training the model
features = Features({
    'pixel_values': Array3D(dtype="float32", shape=(3, 224, 224)),
    'input_ids': Sequence(feature=Value(dtype='int64')),
    'attention_mask': Sequence(Value(dtype='int64')),
    'bbox': Array2D(dtype="int64", shape=(512, 4)),
    'labels': Sequence(feature=Value(dtype='int64')),
})

# Prepare our train & eval dataset
train_dataset = dataset["train"].map(
    prepare_dataset,
    batched=True,
    remove_columns=column_names,
    features=features,
)
eval_dataset = dataset["test"].map(
    prepare_dataset,
    batched=True,
    remove_columns=column_names,
    features=features,
)
定义评估指标
from docai.training import generate_layoutlm_compute_eval_metric_fn

# Use this utility from the docai SDK to create a function that can
# be used to calculate the evaluation metrics while training
compute_eval_metrics = generate_layoutlm_compute_eval_metric_fn(
    ner_labels=label_list,
    metric_name="seqeval",
    return_entity_level_metrics=False
)
训练模型
'''
Define our model, as well as the TrainingArguments which includes all the
hyperparameters related to training.
'''
from transformers import TrainingArguments, Trainer
from transformers import LayoutLMv3ForTokenClassification
from transformers.data.data_collator import default_data_collator
MODEL_NAME = 'us_dl_model'
model = LayoutLMv3ForTokenClassification.from_pretrained(
"microsoft/layoutlmv3-base",
id2label=id2label,
label2id=label2id)
training_args = TrainingArguments(
output_dir=MODEL_NAME,
max_steps=1000,
per_device_train_batch_size=2,
per_device_eval_batch_size=2,
learning_rate=1e-5,
evaluation_strategy="steps",
eval_steps=100,
load_best_model_at_end=True,
metric_for_best_model="f1")
# Initialize our Trainer
trainer = Trainer(
model=model,
args=training_args,
train_dataset=train_dataset,
eval_dataset=eval_dataset,
tokenizer=processor,
data_collator=default_data_collator,
compute_metrics=compute_eval_metrics,
)
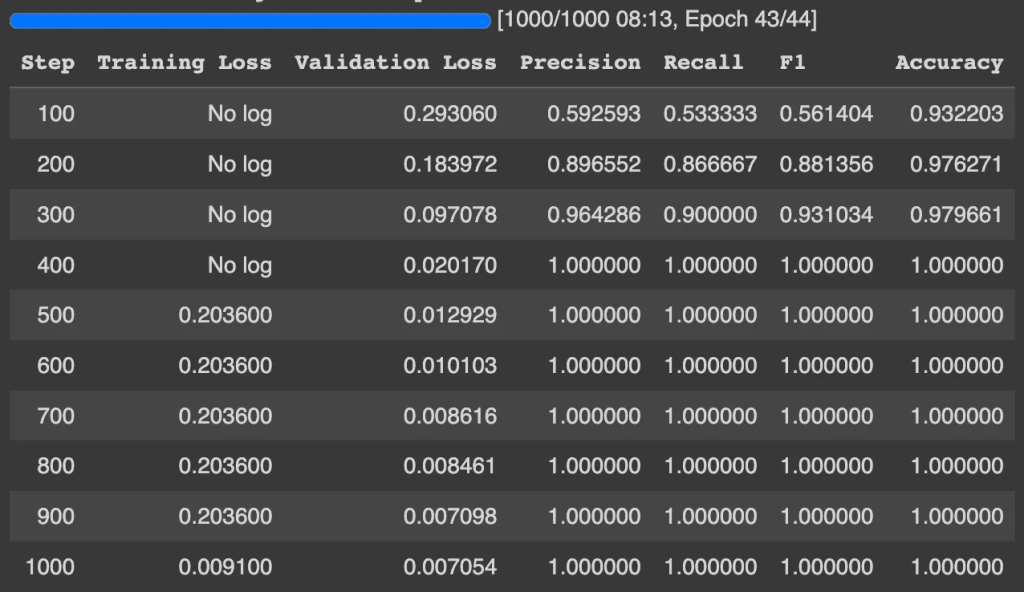
trainer.train()训练完成后,应该会看到有关它在 eval 数据集上的表现的指标:
可以将模型发布到 Hugging Face 中心以供将来使用:
# If you want, log in to the hugging face hub and push your
# model for future use
from huggingface_hub import notebook_login
notebook_login()
model.push_to_hub(repo_id='my/repo-id')
运行推理
'''
Run inference on the model using the processor and model from above
'''
from transformers import AutoModelForTokenClassification
import torch

example = dataset["test"][1]
image = example["image"]
words = example["tokens"]
boxes = example["bboxes"]
ner_tags = convert_ner_tags_to_id(example["ner_tags"])

encoding = processor(image, words, boxes=boxes, word_labels=ner_tags, return_tensors="pt")

if torch.cuda.is_available():
  encoding.to("cuda")
  model.to("cuda")

with torch.no_grad():
    outputs = model(**encoding)

logits = outputs.logits
predictions = logits.argmax(-1).squeeze().tolist()
labels = encoding.labels.squeeze().tolist()

def unnormalize_box(bbox, width, height):
     return [
         width * (bbox[0] / 1000),
         height * (bbox[1] / 1000),
         width * (bbox[2] / 1000),
         height * (bbox[3] / 1000),
     ]

token_boxes = encoding.bbox.squeeze().tolist()
width, height = image.size

true_predictions = [model.config.id2label[pred] for pred, label in zip(predictions, labels) if label != - 100]
true_labels = [model.config.id2label[label] for prediction, label in zip(predictions, labels) if label != -100]
true_boxes = [unnormalize_box(box, width, height) for box, label in zip(token_boxes, labels) if label != -100]
可视化预测结果
'''
Some simple utilities for drawing bboxes on images of Driver's Licenses
'''
from PIL import ImageDraw, ImageFont

font = ImageFont.load_default()

def iob_to_label(label):
    label = label[2:]
    if not label:
        return 'other'
    return label

def draw_boxes_on_img(
    preds_or_labels,
    boxes,
    draw,
    image,
    unnormalize = False
):
  label_color_lookup = {
      "drivers_license_number": "green",
      "expiration_date": "blue",
      "date_of_birth": "red",
      "first_name": "orange",
      "last_name": "yellow",
      "address": "purple"
  }

  for pred_or_label, box in zip(preds_or_labels, boxes):
    label = iob_to_label(pred_or_label).lower()

    if label == 'other':
      continue
    else:
      if unnormalize:
        box = unnormalize_box(box, width, height)

      color = label_color_lookup[label]
      draw.rectangle(box, outline=color)
      draw.text((box[0] + 10, box[1] - 10), text=label, fill=color, font=font)

'''
Draw predictions
'''
image = example["image"]
image = image.convert("RGB")

draw = ImageDraw.Draw(image)

draw_boxes_on_img(true_predictions, true_boxes, draw, image)
image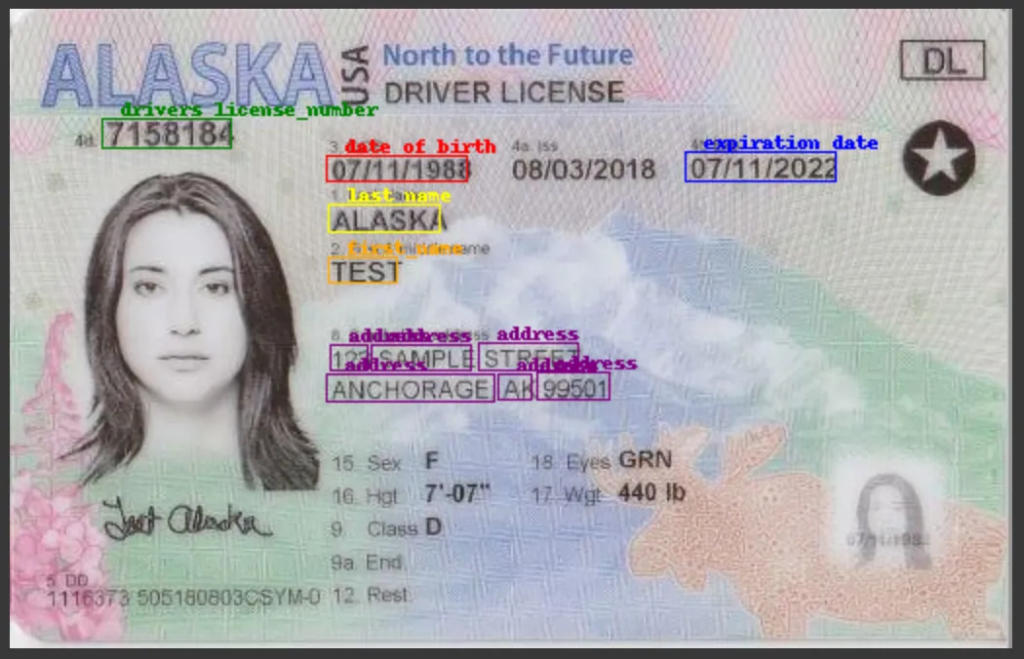
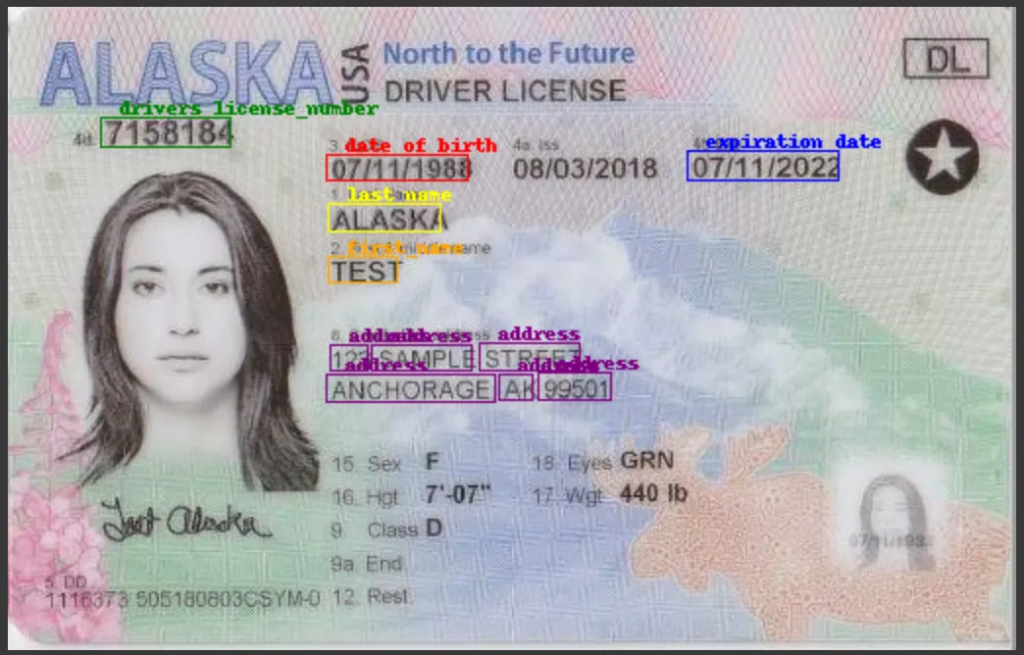
并与实际的地面真实值进行比较:
'''
Compare to ground truch
'''
image = example["image"]
image = image.convert("RGB")

draw = ImageDraw.Draw(image)

draw_boxes_on_img(example['ner_tags'], example['bboxes'], draw, image, True)

image
可以看到我们的 LayoutLM 模型有多准确:
LayoutLM 是一个功能强大的多模态模型,您可以将其应用于许多不同的文档 AI 任务。
在小程序上阅读本文:


Reference:
https://medium.com/@matt.noe/tutorial-how-to-train-layoutlm-on-a-custom-dataset-with-hugging-face-cda58c96571c
https://github.com/NielsRogge/Transformers-Tutorials/blob/master/LayoutLMv3/Fine_tune_LayoutLMv3_on_FUNSD_(HuggingFace_Trainer).ipynb
https://medium.com/@kirudang/automated-text-data-extraction-and-form-filling-system-8c97250da6aa
https://arxiv.org/pdf/2204.08387.pdf
https://github.com/microsoft/unilm/tree/master/layoutlmv3
https://github.com/NielsRogge/Transformers-Tutorials/blob/master/LayoutLMv3/README.md
https://colab.research.google.com/drive/1KtzdLOpLQhHrca8oRM5s8fjKiMgkl5mb#scrollTo=P_bmoVcShf6E